ABAP Tutorial
7 ABAP List Views
We are
-
1. create a table we want to output
-
2. create an object variable of type cl_salv_table
-
3. beautifying our (ALV) with optimized column width, list headers, striped patterns, etc.
-
4. let the user sort and filter our ALV
a Capture input parameter and create an output table
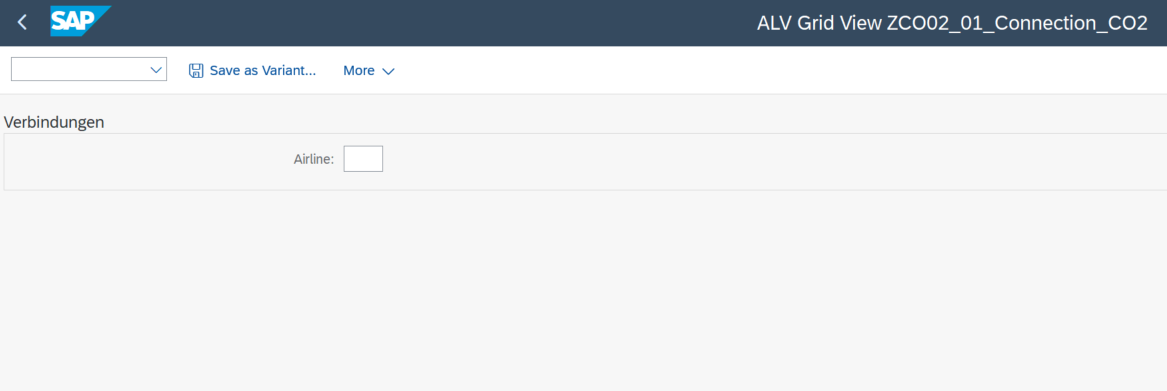
First we create a SELECTION-SCREEN to input a parameter:
1   REPORT zco2_01_connections .
2   SELECTION−SCREEN BEGIN OF BLOCK a1 WITH FRAME TITLE TEXT−f01.
3   " Uberschrift   ist im   Textfeld   f01   hinterlegt .
4   PARAMETERS: p_carr TYPE sflight − carrid .
5   SELECTION−SCREEN END OF BLOCK a1.
The input SELECTION-SCREEN looks as follows:
 )
)
Then we create the table lt_ausgabe which we want to output.
1    SELECT ∗
2    FROM zco2_01_connection_co2
3    WHERE Anbieter = @p_carr
4    INTO TABLE @DATA(lt_ausgabe).
5
6    IF lt_ausgabe   IS INITIAL .
7    Message i001 (ZCO2N01).
8    ELSE.
9    \ subsection { Create   object   of type \ verb | cl_salv_table |}
10
11
b Creating a clsalvtable object
Now we create an object variable of type cl_salv_table.
1   ∗    ∗∗∗∗∗∗∗∗∗∗∗∗∗∗∗∗∗∗∗∗∗∗∗∗∗∗∗∗∗∗∗∗∗∗∗∗∗∗∗∗∗∗∗∗∗∗∗∗∗∗∗∗∗∗∗∗∗∗∗∗∗∗∗∗∗∗
2   ∗ALV GRID erzeugen
3   ∗    ∗∗∗∗∗∗∗∗∗∗∗∗∗∗∗∗∗∗∗∗∗∗∗∗∗∗∗∗∗∗∗∗∗∗∗∗∗∗∗∗∗∗∗∗∗∗∗∗∗∗∗∗∗∗∗∗∗∗∗∗∗∗∗∗∗∗
4
5   DATA: lo_salv      TYPE REF TO cl_salv_table .
6   ∗ Create the ALV object
On this lo_salv object we can operate all the
c Our very simple ALV grid
We needed to TRY because we need to catch the exception cx_salv_msg.
1   TRY.
2    cl_salv_table => factory (
3   IMPORTING
4    r_salv_table   = lo_salv
5   CHANGING
6   t_table         = lt_ausgabe     ).
We have created the object, however, we still need to output it withÂĺ
1 lo_salv −> display ( ) .
When copying all the code snippets, do not forget to delete the previous lo_salvâĘŠdisplay ( ) since we insert it at the very end.
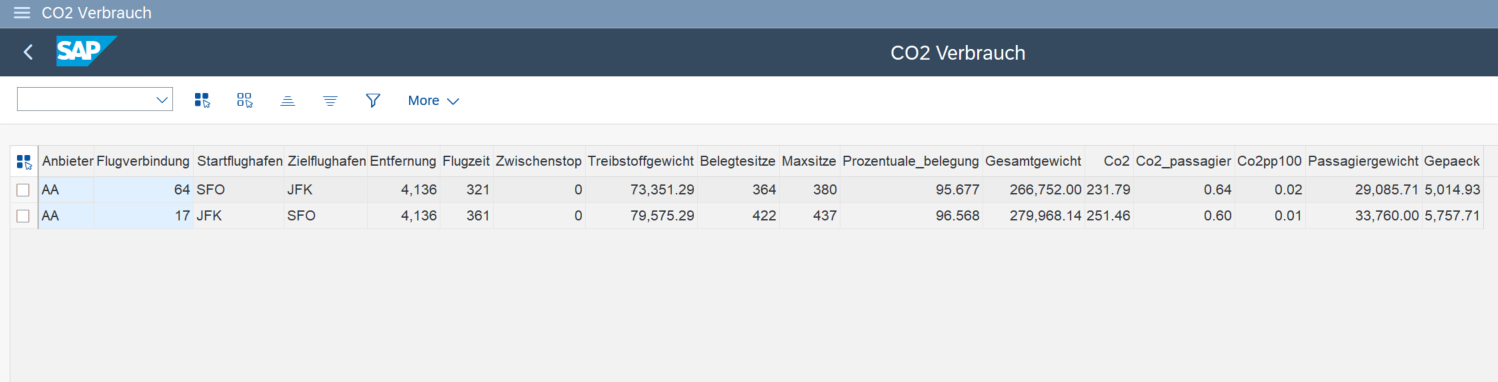
The table we output is on line 7 ltausgabe.
d Beautifying our ABAP List View (ALV)
Now we beautify our table.
-
1. We optimize the column width in line 2
-
2. we set a list header (line 3)
-
3. we stripe the results for better legibility (line 4)
-
4. TBD
1     ∗ Basic     Settings
2     lo_salv −> get_columns ( )−> set_optimize ( abap_true ) .
3     lo_salv −> get_display_settings     ( )−> set_list_header ( ' CO2 Verbrauch ' ) .
4     lo_salv −> get_display_settings     ( )−> set_striped_pattern ( abap_true ) .
5     lo_salv −> get_selections ( )−> set_selection_mode (             if_salv_c_selection_mode =>row_column ) .
6
7     "Column headings :     technical   Name und    description
8     LOOP AT lo_salv−> get_columns ( )−> get ( ) ASSIGNING FIELD−SYMBOL(<c>).
9     DATA(o_col) = < c > −r_column.
10     " Set Short Text to empty , so that      autosize       works for    columns
11     o_col −> set_short_text ( || ) .
12     " Set medium Text to empty , so that         autosize    works for    columns
13     o_col −> set_medium_text ( || ) .
14    DATA(lv_columnname)         = o_col −> get_columnname ( ) .
15    TRANSLATE lv_columnname TO LOWER CASE.
16    TRANSLATE lv_columnname(1) TO UPPER CASE.
17     o_col −> set_long_text ( |{ lv_columnname }| ) .
18    ENDLOOP.
This is how everything looks like
If you look closely, above the results we have icons, allowing us to
-
1. select all
-
2. deselect all
-
3. sort ascending
-
4. sort descending
-
5. filter
our results.
![]()
e Filter and Sorting the ALV
Here we implement the feature to filter and sort the results.
1   lo_salv −> get_functions (   )−> set_filter (     ) .
2   lo_salv −> get_functions (   )−> set_sort_asc (     ).
3   lo_salv −> get_functions (   )−> set_sort_desc (        ).
4   lo_salv −> display ( ) .
Just to be complete, we need close our TRY and ENDIF.
1   CATCH cx_salv_msg.
2   ENDTRY.
3   ENDIF.
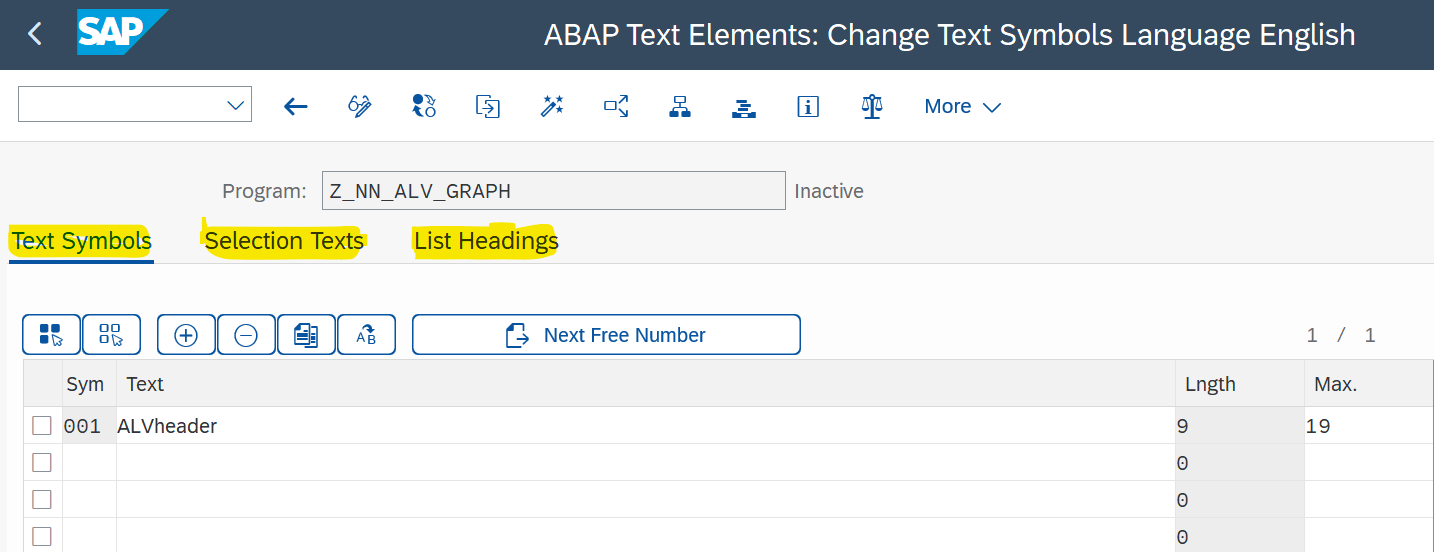
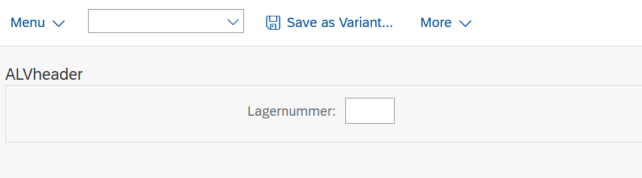
f Naming the headers of ALV grids and descriptions of selection parameters
How to get the header ALVheader and the parameter Lagernummer (instead of the uglily named p_lagnum) into our ALV Grid.
In transaction SE38 click GOTO->Text Element.
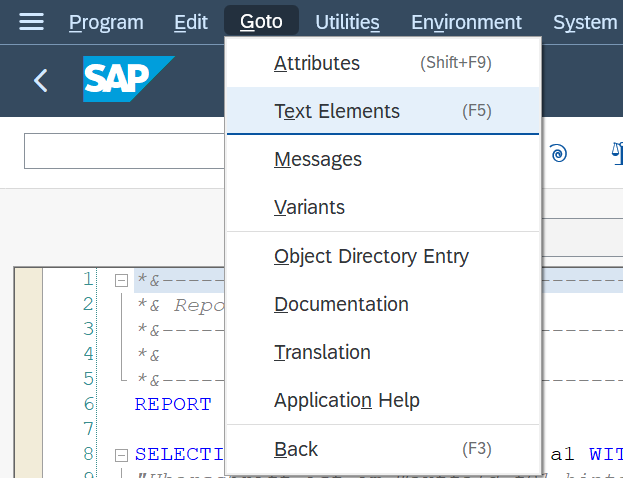
The Text element Screen opens and you can edit the Selection Texts and List Headings (highlighted in yellow).